Reviews by category
Music Conversion
Buy Now...


My music collection spreads over vinyl, tapes, compact disks and MP3 tracks with the latter consisting of duplicates from the compact disks. Recently I have been looking at a way of converting the first two categories into MP3 tracks that can then be burned on to optical media. The product under test is SnapMusic Studio 715 from KWORLD.
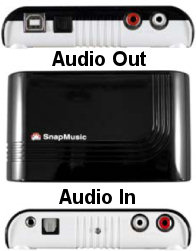
Opening the box reveals a small SnapMusic Studio 715 device; various cables; a couple of CDs; and a multi-language Quick Start Guide which leads the user through the process of linking your computer and music source by using the SnapMusic device. Coloured black over white, the SnapMusic Studio 715 unit measures 110 x 64 x 20mm with connection sockets on the front for USB plus SPDIF and audio output while the rear houses SPDIF, audio and microphone input connections. As standard you are supplied with a USB cable; double-headed RCA audio cable; plus an adapter that is meant to allow you to use the headphone jack of whatever is your audio source. Unfortunately my Hi-Fi system featured a 3cm jack socket rather than the 1.5cm jack supported by the SnapMusic adapter. A quick search through my assortment of Hi-Fi leads produced an extension adapter that allowed me to make the necessary connection and also gave me greater freedom in positioning of the various elements by adding length to the connection.
Bucking the normal trend, you need to attach the SnapMusic Studio device to the computer and allow it to be recognised prior to installing the supplied software. As mentioned earlier you get a couple of CDs holding the SnapMusic software and a copy of Roxio Easy Media Creator 9.05LE. You should install the SnapMusic software first which allows you to define the type of connection being used; the file format to be applied with a choice of WAV, MP3 or WMA; and designate the folder for storing any recordings. One point that you should be aware of is that the SnapMusic software grabs control of your audio record and playback settings. While this is necessary for any recordings using the device, the same is not true for playback and you might feel the need to switch back to the playback device used previously.
The second installation, which consists of the Roxio software, does tend to stretch the patience due to its long drawn procedure. At one point I though the installation had stalled but it was just taking its time before moving on to the next stage. Once this installation has been completed you will need to restart the computer.
Both applications allow you to use the SnapMusic Studio device to capture and convert content into a designated format. SnapMusic operates from a floating control panel. This allows you to make adjustments to various settings with buttons to select the appropriate connection type plus start and stop recordings. By default files recording by SnapMusic will be named using the current date and time.
The Roxio software has far greater functionality including the ability to record a complete LP or tape and then split the recording into individual tracks that can have appropriate tags attached. The splitting feature is not present in the SnapMusic software nor was I able to transfer a recording using this software into Easy Media Creator for splitting. Generally I felt that the quality of recording was slightly superior when using the SnapMusic offering and there was a definite difference in file size with the advantage going to SnapMusic.
However the quality achieved by both software methods shown some degradation with regards to the original recoding. This product is more suited for use with developing podcasts rather than converting and burning your vinyl or tape collection to CD. Available for £45.51, SnapMusic Studio 715 requires a Pentium III 500MHz processor with 256MB RAM running Windows XP (SP2) or
| add to del.icio.us | Digg this review |
| StumbleUpon | |


 !!
!!


Comment by signum505, 2 Mar 2012 17:15
This is what you need to do:
1. Place the SNAP Music product and respective packaging back in the box.
2. Take the box back to Maplins and demand a refund. I got one because I argued it did not work with Windows 7.
3. Go Online and search for AUDACITY freeware. Download this and install it.
You will also need to install the LAME plugin for MP3, and i think there is another plugin for iTunes. Scratch around for comments and tutorials if you need help.
4. Go to Richer Sounds and purchase a "Phono Stage" if you dont already have one.
This was ultimately what I did.
I then spent the next 6 months cutting my whole vinyl collection into mp3, and have spent the last year mixing those mp3's to amazing effect.
A bit of effort involved but you will be glad you put it in, in the end.
Good luck!